Puppetry Tech Notes

   Archives


powered by FreeFind

Tuesday, April 19, 2005


S T Y R O G O Y L E S


SPRING 2005


Styrogoyles were invented for one of the early First Night parades in Boston. The year before we had suffered in the cold hoisting top-heavy Bread & Puppet ?gures. I was determined to create something lighter, so I requested a small budget and set to scrounging. I had orginally intended to use beadfoam packing forms simply as a light-weight base on which make several cloth-covered paper-mache heads. As I assembled “skulls” from my collection of odd foam shapes, I became inspired by these artifacts themselves and STYROGOYLES were born.

So to begin:
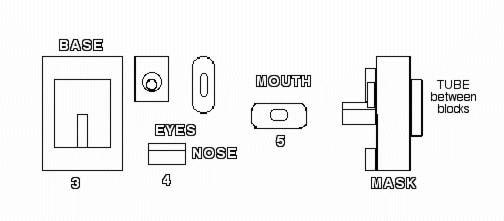
First look at the scratch illustration at the bottom of the page

1) Collect a number of beadfoam packing forms, including those from the boxes of past warantee appliances and electronic equipment creating a ?re hazard in your attic.
2) Get a package of 10" bamboo cooking skewers and a low temp hot-glue gun and clear some table space.
3) Start with a large rectangular shape, or join two similar pieces to form something of the sort for a base. Fasten beadfoam units together by carefully pushing skewers through both pieces. Use hot-glue sparingly to reinforce the joints. Decide which is the bottom of the face.
4) Faces are bilaterally symmetrical. Find two smaller shapes about the same size, either identical, mirror image, or just interesting together with holes in them. Position these above the midline of the base for eyes, leaving room for a nose. Then ?nd an interesting single solid piece for a nose and put it in place.
5) Finally ?nd a medium sized open piece for a mouth, perhaps something with tooth-like notches and put it below the nose. The mouth doesn't have to be straight or centered as long as it looks like one. The idea is to create a head with a profile as well as a head-on look.
6) Anchor the features to the base using skewers but don't glue them yet. Let the ends of the skewers stick out. Pick your STYROGOYLE up off the table and look at it from the side, from below, etc. Make approriate adjustments.
7) Now lay it back down and glue the smaller pieces to the base, add extra skewers, or even tie pieces in place. Cut off any protruding skewers with electricians pliers or heavy shears.
8a) A STYROGOYLE can be used as a two-handed mask, but if you want to put it on a pole, get a heavy cardboard tube. Ones from bolts of cloth are ideal. Glue and tie this to the back of the base. Use strips of white cloth to tie it on. Mount two similar pieces of beadfoam on either side of the tube at the top of the head to brace it and to make a better pro?le behind.
8b) If you can find tubes that fit in each other, put a short piece of the larger size on the back of the mask. Glue a smaller tube in the end of a full length larger tube. You should be able to display the head than six feet to eight feet overhead. Make a simple cloth sling that goes around the back of your neck and forms a pocket at your beltbuckle. Tuck the bottom of the tube in there take take up the weight and head for a parade. Tubes look better painted with black or white house paint.
9) Add decorations, such as hair made from strips of plastic bag or thin ?exible packing foam, or plastic plate earrings. You can cut disks of broiler foil and hang them in the eye holes. Don't be afraid to incorporate open spaces into your design. Holes help.
10) I leave my creations basically white; they show up better at night, but if you want to paint them, use cheap white ceiling paint as a primer, then craft grade acrylics for the art work. Try spattering or airbrushing for texture.
11) Holes in the design will let the wind through. You can add a thin shoulder board made from doubled cardboard or wall paneling scrap and hand strips of plastic or cloth down for a sort of costume. These move in the wind well.
12) It's probably best to dispose of STYROGOYLES properly rather that try to store them since the materials aren't partucularly fire resistant.


Email:Will Stackman

posted by will 5:14 PM


Monday, April 18, 2005


Suspended Horse


instructions - Will Stackman ; Spring 2005


(based on a Puppeteers Collective design)


Active youngsters really get into these simple parade pieces which doesn't require any masking. The figure is based on the pantomime hobby horse from British tradition. A group of these makes an easy display and stores in very little space.


1) Get a roll of relatively soft fence or heavy bailing wire. Each horse takes about 5 yards.
2) Draw an 3 foot oval on a piece of thick plywood about 3' x 4'. Drive 8d nails 4" to 6" apart around the circumference.
3) Starting at either long end, leave a 12" to 18" "tail" and wrap the wire around the oval twice. Leave a similar "tail" at the end.
4) Wrap duct tape around the wire loop several times on each side. The springier the wire, the more taping needed.
5) Twist the two "tails" together and bend up for a neck to support the head.
6) Draw whatever size horsehead with a neck needed. Trace and cut out two copies on corrugated cardboard and two on light posterboard.. Make the same 1" deep slot in the bottom of all four pieces about 2" from the back of the neck. (This slot will slip over the body oval to keep the head from turning)
7) The flat posterboard heads can be decorated before installation. Lay them nose to nose and draw more or less identical features on each. Half styrofoam ball eyes and paper sculpture ears and nostrils can give dimension. Textured collage materials also help as well as ribbon for the headstall and bridle.The mane will be added during assembly.
8) Depending on time available and whether these figures are intended to last for more than one parade, varying assembly techniques can be used. A large pinch type stapler is a real help when using corrugated cardboard. Hot glue and lacing are also options.
9)Staple and/or tape the front of the head from the top around under the chin and down the front of its neck. Slip the head over the wire neck on the oval and fasten the bottom A piece of plastic cut from a milk jug can be used to reinforce the slot.
10) Insert whatever material used for the mane into the back of the neck and staple This could range from shredded paper or cloth to raffia, wool tufts, or unraveled coarse rope. Hot glue may help with this part of the installation or the edge can be laced shut, "sewing" the mane in place.
11) Wait to put the two posterboard faces on last. First tie the shoulder straps, made from torn strips of muslin or broad cloth on. One continuous one starts a few inches from one side of the head runs up and around the back of the rider's neck and back to the other side, about in the center of the oval. Two shorter straps are first tied then safety pinned to this loop 8" to 10" apart behind the neck. These run down to the oval several inches on either side of the tail area. Adjust to fit the rider. Straps can also be made from old stocking or panyhose.
12) A strip of cloth at least 18" wide with a pocket in the top edge can be slipped over the continuous loop to hang down between the two back straps forming a cape and neck padding for the rider/puppeteer. A continuous skirt is sewn or stapled to the oval hoop starting on side of the tail around the front and back to the other side. Tails should match the mane and are secured to the back of the oval.
13) Use safety pins for initial installation, especially if the puppet is being fitted to a particular rider. Pins are also useful to adjust the fit of the straps later on. Pretend legs for the rider can be fastened to the skirt on either side, positioned in relation to the straps.
14) Fasten the two decorated posterboard faces onto the corrugated cardboard head. Glue is best. The edges can be taped with appropriate colored tape and the decoration touched up. To make the head really stable, punch a hole through all the cardboard where the bridle would fasten to the bit and run a strip of cloth through. Tie either end to the oval 3" inched or so from the head. Tape in place.
15) To operate, drop the "horse" over the riders head and settle the should straps in place. The rider grasps the oval near the head where the bridle attaches. With a little practice and some fitting adjustment, the horse is ready to prance. To dismount, it's easiest to slip the straps off and drop the puppet to the ground, then step out carefully.
16) A pile of such figures will stack neatly on top of each other by alternating head and tail, putting the heads side by side. Store additional costume items for the riders stacked on the bodies.
17) If three dimensional heads are made, using papier mache for example, these will require more storage space, but can be similarly decorated and mounted.


Materials list


Wire for oval; nails and base for bending jig.
Duck tape

Corrugated cardboard, medium weight
Light posterboard
Styro balls, paper sculpture weight art paper, ribbon, etc -optional 3d decor

Paints, markers, crayons
Assorted fabric for skirts and capes
Stuff for mane and tail.
Pinch stapler, hot glue, white glue, thick soft string (optional lacing)


Scratch illustration at bottom of http://www.geocities.com/profwlll/PunchPix.html

posted by will 3:36 PM

Indexed by the FreeFind Search Engine.